Showing posts with label DAS. Show all posts

Tuesday, August 9, 2016

How to Configure SAML2 SSO in WSO2 DAS Portal

Single sign-on (SSO) allows users, who are authenticated against one application, gain access to multiple other related applications without having to repeatedly authenticate themselves.

Following this blog, you can configure SSO for DAS Portal and Management Console. This post is applicable to DAS 3.1.0+.
  1. Share user store between WSO2 DAS and WSO2 Identity Server following this.
  2. Mount and share registry between WSO2 DAS and WSO2 Identity Server following this.
  3. Login to Identity Server and Go to Home > Identity > Service Providers > Add page.
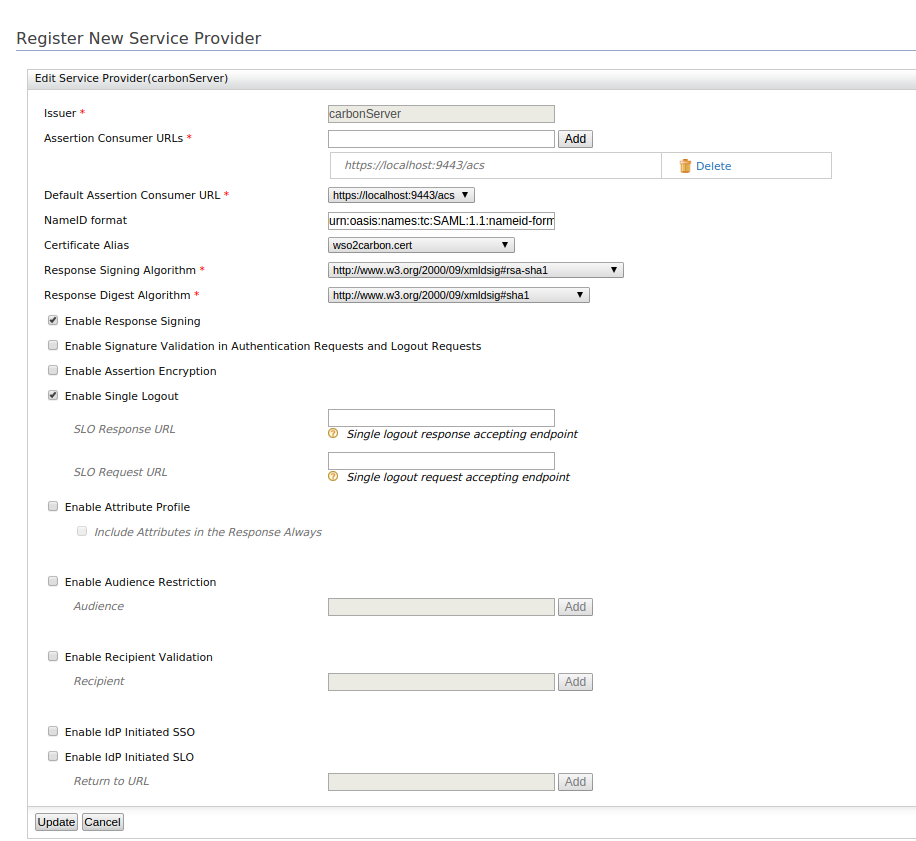
  4. Create a service provider for Management Console with following configuration.
    • Issuer : carbonServer
    • Assertion Consumer URL : https://<DAS_URL>:<DAS_PORT>/acs
    • Select the following options:
      • Enable Response Signing
      • Enable Single Logout 

        For Example :

  5. Create a service provider for DAS  Portal with following configuration.
    • Issuer : portal
    • Assertion Consumer URL : https://<DAS_URL>:<DAS_PORT>/portal/acs
    • Select the following options:
      • Enable Response Signing
      • Enable Single Logout
      • Enable Audience Restriction and enter following 2 audiences.
        • Token endpoint url (eg: https://<IDP_URL>:<IDP_PORT>/oauth2/token )
        • Management console issuer name (i.e. carbonServer)
      • Enable Recipient Validation and enter the following recipient.
        • Token endpoint url (eg: https://<IDP_URL>:<IDP_PORT>/oauth2/token )
          For Example :
  6. Change the SAML2SSOAuthenticator configuration in <DAS_HOME>/repository/conf/security/authenticators.xml file as follows:
    • Set disabled = false in <Authenticator> element
    • ServiceProviderID : it is the issuer name of the service provider created in step 4 (carbonServer)
    • IdentityProviderSSOServiceURL : https://<IDP_URL>:<IDP_PORT>/samlsso
    • AssertionConsumerServiceURL: https://<DAS_URL>:<DAS_PORT>/acs
  7. Change the "authentication" configuration in <DAS_HOME>/repository/deployment/server/jaggeryapps/portal/configs/designer.json
    • activeMethod :sso
    • issuer: portal
    • identityProviderURL: https://<IDP_URL>:<IDP_PORT>/samlsso
    • acs : https://<DAS_URL>:<DAS_PORT>/portal/acs
  8. Restart DAS server.

Saturday, July 30, 2016

[WSO2 DAS] How to Control Spark Log File Generation.


When Spark scripts are executing in the DAS server, you can be see several Spark log files in <DAS_HOME>/work directory. If you execute number of spark scripts often, you might face a disk space issue as there will be a lots of log files.

If you want to allocate a disk space of predefined size for Spark log files, add below configuration to <DAS_home>/repository/conf/analytics/spark/spark-defaults.conf
   
   spark.executor.logs.rolling.strategy size  
   spark.executor.logs.rolling.maxSize 10000000  
   spark.executor.logs.rolling.maxRetainedFiles 10  


spark.executor.logs.rolling.maxSize contains the maximum size of disk space (in bytes) allocated for log directory. Older log files are deleted when new logs are generated so that the specified maximum size is not exceeded.

spark.executor.logs.rolling.maxRetainedFiles contains the maximum number of log files allowed to be kept in log directory at any give time.

spark.executor.logs.rolling.strategy contains the strategy used to control the log files. From above configuration, the amount of log files is restricted based on the size of log directory. 

For other related configuration, you can see Spark docs

If you want to change the default log directory location, change spark.worker.dir config of <DAS_home>/repository/conf/analytics/spark/spark-defaults.conf like below.
   
   spark.worker.dir /home/ubuntu/sparkout  
   
Make sure to restart the server to apply above configuration to the server.


Monday, July 11, 2016

How to connect WSO2 App Manager with WSO2 DAS

Configuring MYSQL

  1. Create new database called APPM_STATS_DB in MYSQL server.
  2. Create tables inside the created database by executing script.

Configuring WSO2 DAS

  1. Download WSO2 DAS 3.0.1
  2. If App Manager and DAS are running on the same machine, follow this step.
    Set Offset value to 3 in <DAS_HOME>/repository/conf/carbon.xml

  3. Specify the datasource definition  in the  <DAS_HOME>/repository/conf/datasources/master-datasources.xml
     to connect early created APPM_STATS_DB database.

    <datasource> <name>WSO2AM_STATS_DB</name> <description>The datasource used for setting statistics to APP Manager</description> <jndiConfig> <name>jdbc/WSO2AM_STATS_DB</name> </jndiConfig> <definition type="RDBMS"> <configuration> <url>jdbc:mysql://localhost:3306/APPM_STATS_DB?autoReconnect=true</url> <username>db_username</username> <password>db_password</password> <driverClassName>com.mysql.jdbc.Driver</driverClassName> <maxActive>50</maxActive> <maxWait>60000</maxWait> <testOnBorrow>true</testOnBorrow> <defaultAutoCommit>false</defaultAutoCommit> <validationQuery>SELECT 1</validationQuery> <validationInterval>30000</validationInterval> </configuration> </definition> </datasource>

    Note : Auto Commit option should be disable when working with DAS.
  4. Copy the database driver to <DAS_HOME>/repository/components/lib folders.
  5. Restart DAS server.
  6. Login to DAS Admin console.
  7. Navigate to Home > Manage > Carbon Applications > Add and upload the .car file

Configuring WSO2 App Manager


  1. Change following configurations in <APPM_HOME>/repository/conf/app-manager.xml
  2. Specify the datasource definition  in the  <APPM_HOME>/repository/conf/datasources/master-datasources.xml
    <datasource> <name>WSO2AM_STATS_DB</name> <description>The datasource used for setting statistics to APP Manager</description> <jndiConfig> <name>jdbc/WSO2AM_STATS_DB</name> </jndiConfig> <definition type="RDBMS"> <configuration> <url>jdbc:mysql://localhost:3306/APPM_STATS_DB?autoReconnect=true</url> <username>db_username</username> <password>db_password</password> <driverClassName>com.mysql.jdbc.Driver</driverClassName> <maxActive>50</maxActive> <maxWait>60000</maxWait> <testOnBorrow>true</testOnBorrow> <defaultAutoCommit>false</defaultAutoCommit> <validationQuery>SELECT 1</validationQuery> <validationInterval>30000</validationInterval> </configuration> </definition> </datasource>
  3. Copy the database driver to <APPM_HOME>/repository/components/lib folders.
  4. Restart App manager.